Introduction to Rhythm Changes for Jazz Guitar
Sep 08, 2020How to Improvise and Play Chords on the "I Got Rhythm" Chord Progression — One of the Most Common Progression in Jazz
We've all heard it, the so-called "Rhythm Changes." Commonly known, as a set of chord changes based on George Gershwin's classic I've Got Rhythm.
If you've taken any jazz guitar lesson or read any books, you know that several tunes are based on this progression and hundreds of songs have been "built" on top of its basic form.
In this lesson, we'll go over this popular song form and discuss how to approach it from different angles. In summary, I'll show you how to play chords on rhythm changes, and improvise on the chord progression as well. :)
BEWARE! This form is easy to begin playing but difficult to master. Take your time and really learn the ins and outs. It's often called at very fast tempos at jam sessions (240+ bpm)!
See 6:30 in the video. As you can hear in the video associated to this blog post, it's best NOT to improvise on rhythm changes "chord-by-chord": understand how the progression works as a whole, and keep it real!
Lastly, before we get started, BE SURE to DOWNLOAD your PDF here and follow along with the video timestamps throughout the lesson and video.
What's the deal with the "Rhythm Changes" form?
The Rhythm Changes form is a classic AABA 32-bar form. See the video at 04:25. As stated, this progression is taken from the Gershwin classic, "I've Got Rhythm," and many tunes are based on it, particularly in the bebop period.
For the A section, bars 1 and 2 contain a simple I-VIm-IIm-V progression in Bb, and a III-VI-II-V variations in bars 3 and 4.
Then, for bars 5 through 6, we have a quick move to the IV chord - in this case, Eb major, with its own secondary II-V - and finally, a turnaround back to the I.
Notice how "going to IV" is also a component of virtually every blues progression.

Notice how the "first A" is different on the second repeat. That's something to be careful with: endings will differentiate which "A" you're currently on. This is a trick to keep your place in the form.
Remember, we're doing AABA, and the first A is "unique", with its own III-VI-II-V at the end.
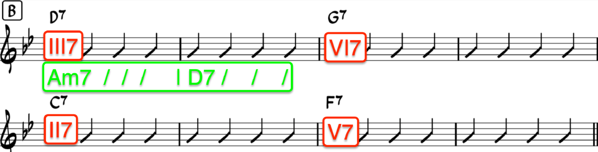
For the B section, we are simply cycling dominants starting from the III of the key (D7 in the case of Bb rhythm changes). Sometimes, you'll see this interpolated with each chord's related IIm chord. That is, instead of playing D7 for two bars, you could hear Am7 one bar, then D7 one bar.
Either way, it is essentially the same.
Therefore, the progression goes D7 - G7 - C7 - F7 which leads us back to the I chord (Bb) at the beginning of the last A section.
Which tunes are based on this form?
Where to begin? I'll list some, but there are quite a few!
- Wee
- Cotton Tail
- Oleo
- Dexterity
- Rhythm-a-Ning
- Anthropology
- The Eternal Triangle
- Moose the Mooche
Step 1 - Learn an Interesting Head (Melody) - 07:48
One great place to start is to simply learn a head - otherwise known as a melody - that will keep your interest. You need to be able to walk into a jam session and at the very least call a good rhythm changes tune and play it half-decently.
A common thing that happens to beginners is that they'll get lost in the form while improvising or comping behind another player. Learning melodies will help you keep your place in the form since, there tends to be some confusion when the last "A" comes back around to the first "A."
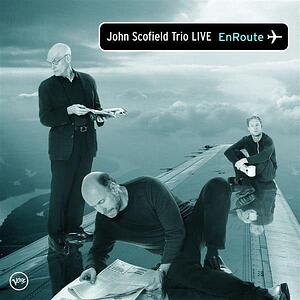
For this lesson, I've chosen the tune Wee, which is also on one of my favorite John Scofield recordings. In the video lesson, you can hear the demo at 09:06
Step 2 - Comping with Basic Chords on Bb Rhythm Changes - 09:52
Here, I'm giving you some basic shell voicings with easy extensions that you can use to comp over this form. These shapes are very useful because they leave lots of room on the top two strings for extensions, should you choose to use them.
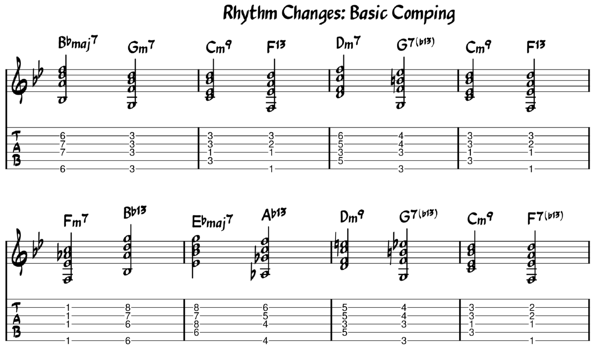
You'll notice in the video at 10:44, I play those chord shapes "activated." I've also added some rhythms for interest. Do the same, and make it swing! :)
Step 3 - Comping with Chords on the Top Strings with Inversions and More - 11:40
This section will be much like the previous one, only with a bit more meat. Here, we're using chord shapes commonly known as drop 2 voicings for the majority of the study.
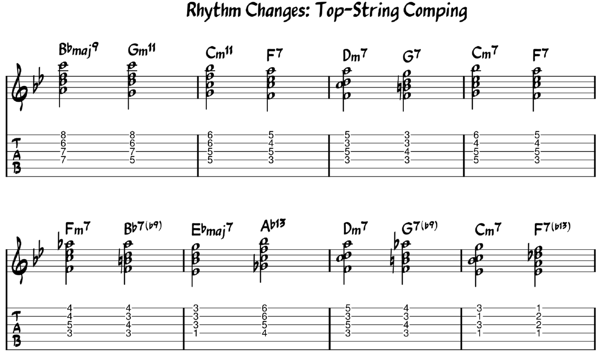
Same process with the top string.
Notice how the performance at 12:41 has some activated rhythms.
Step 4 - Improv on A Section "for Noobs" - 13:41
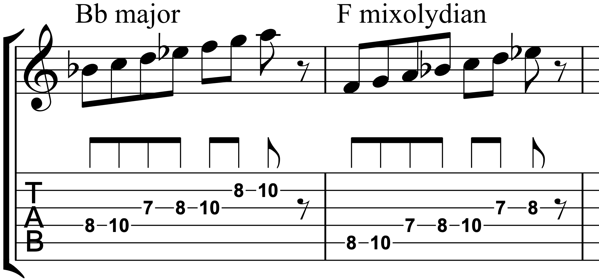
Let's get into improvising over the "A" section of the form. Technically, you could get away with playing around in Bb major over the first few bars, but I want to give you more than that.
If you really want to start sounding like a proper jazzer, you'll want to try hitting some of those changes as you go along. As described in the video, my very first suggestion is to simplify the progression tremendously to make it easy to digest and play on.
The strategy?
Let all these chords go by AND in your improviser's mind, simply think of the chords / scales / arpeggios in red the diagram below:

That's right. For the A section, you'll be "thinking" mostly of the Bbmaj7, and F7 chords. The I and the V. And the associated scales are Bb major, and F mixolydian.
That's quite a relief, right?!
It does work wonderfully for beginners and you only have to think of 25% of the actual chords on the sheet. It is an oversimplification, creating a good basis for soloing in the future.
In the demo portion in the video (16:15), notice how I've played the scales for the first chorus. To get you started, here are the fingerings I've used for Bb major and F mixolydian:
Step 5 - Intermediate Improvisation on the A Section for Bb Rhythm Changes - 18:05
In this next step, we're starting to add more chords to think about into our "improviser's radar". We're not at the FULL complexity yet, but we've added two main things:
- The F7 chords now become Cm7-F7 (that is, the lonely V becomes a II-V)
- We've added the Ab7 (bVII) in bar 6.

Keep your head down, and see if you can improvise by thinking of those chords (only!) in red while the full backing track plays for you.
Starting to get the idea? Hear the demo at 19:33.
Once you feel ready, move on to the next step.
Step 6 - Improv on the A Section: Harder! - 23:55
Now that you've got the hang of it, see how you do with increased complexity in the "chords you'll think about" during improv:

Hear the demo at 25:47. This is pretty close to improvising on the ACTUAL form of the Bb rhythm changes. We have only one step left on the A section.
Step 7 - Improv on the Bb Rhythm Changes' A Section "All In!" - 28:07
And here's your last step, with a few substitutions added for good measure (badoum-tshhhh):

Demo at 30:35
If you're able to play on this (accurately) at the tempo found in the video (144 bpm), I urge you to start increasing the tempo right away. The actual real-playing-situation-life-of-death tempos range from 200 all the way to 340 bpm :)
Step 8 - B Section Improv Using Basic Myxolydian - 35:03
This step is plain boring, so I don't want to spend too much time on it. Simply use the dominant chord-scales you already know to improvise here. No biggie.
D7 = D E F# A B C
G7 = G A B C D E F
C7 = C D E F G A Bb
F7 = F G A Bb C D Eb
Demo at 36:15
Step 9 - B Section Improv with II-V Interpolation - 36:49
Here, notice you can transform any single dominant chord (i.e. D7) into a full-fledged II-V.
How? Pretty simple. Think of the lonely dominant chord as the V in a II-V sequence. You have D7 for two bars; make this into Am7 one bar, and D7 in the next bar:

Demo at 38:27
Step 10 - Three Chord Substitutions Ideas for Improv on the B section - 39:01
To add variety to your improv in the B section of the Bb rhythm changes, I recommend you start using altered scales. Demo at 42:02
Two great places to start:
- Mixolydian #11 scale (1 2 3 #4 5 6 b7)
- The altered scale, aka Super Locrian (1 3 b7 along with b9, #9, b5 and #5)
This is more advanced materials you can review in our ultimate guide to dominant chords here. A great place to START however is with this basic blog post on sounding jazzy with altered dominants.
To give you something to sink your teeth into, here's the spelling for those two scales from a D7 standpoint:
- D7#11 = D E F# G# A B C
- D7alt = Ab7#11 = D Eb F Gb Ab Bb C
The second one is actually a "tritone sub" shortcut. It hurts my head to think about fully altered chords, so I just go the easy way around and think of a tritone substitution and make it 7#11 instead.
If you need to, leave a comments below to ask us about it. :)
CODA: Piece It All Together
Now it's time to put everything you've learned together. Just keep in mind that this is a slow process over an extended period of time. It's important to really absorb all of the little things in order to be able to put the big picture together.
Use this "simplified technique" to build your own approaches to more complex chord progressions. You can simplify virtually anything to I and V if you're able to correctly identify key centers through proper analysis :)
Also see the video at 42:53 for recommendations on further studies (books and resources)
Happy jamming!
**Editor's Note** This post was updated 09/09/2020. ( Imagery, syntax and readability updated.)
MASTER JAZZ GUITAR WITH A SIMPLE, PROVEN SYSTEM
Stop the overwhelm. Skip the endless scales. Get the clear, structured system that helps you actually play jazz guitar – in minutes a day, not years.
Written by